No Added Sugar | No Artificial Flavours | Key Paleo | Gluten-Free | Dairy-Free | Vegan-Friendly | Nut-Free
Did you know that making your own premium homemade vanilla extract takes less than ten minutes of actual hands-on work? With just real Madagascar vanilla beans, alcohol, a clean bottle, and a little patience, you can create a rich, fragrant baking staple that slowly becomes deeper, smoother, and more beautiful over time.

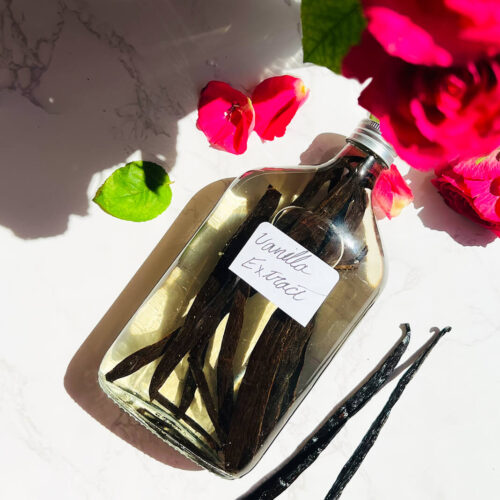
There is something so special about homemade vanilla extract. You can see the tiny black vanilla seeds floating through the bottle, smell the warm sweet aroma as it matures, and know exactly what is going into your cakes, cookies, muffins, granola, custards, and healthy baking recipes. It feels simple and luxurious at the same time, but it is truly one of the easiest pantry staples to make at home.
Many store-bought vanilla extracts can taste flat, diluted, or overly alcohol-forward, and imitation vanilla often misses the deep, complex flavour of real vanilla beans. When you make your own, you control the quality of the beans, the alcohol, and the strength of the flavour, giving you a cleaner, richer vanilla extract that can make everyday baking taste more homemade and special.

For this recipe, Madagascar vanilla beans are split open and covered with alcohol, then left to infuse in a cool, dark cupboard. As the months pass, the alcohol draws out the natural oils, seeds, and deep floral notes from the vanilla beans. After 4 months, it can be used in baking, especially if you split the pods and use a generous amount of vanilla beans, but after 6 months it becomes smoother and more balanced. If you can let it age for 12 months, the flavour becomes even richer, warmer, and more complex. A 6 to 12 month infusion is commonly recommended for fuller homemade vanilla flavour.
In this complete guide, I’ll show you how to make homemade vanilla extract properly, including how many vanilla beans to use, how to split the pods for maximum flavour, how to choose the right bottle, how long to let it infuse, and how to top it up so your vanilla beans always stay covered. Once you start making your own, it becomes one of those beautiful little kitchen habits that makes every bake feel more homemade, fragrant, and special.

Ingredients Needed
- Madagascar vanilla beans
- Vodka or another 35% to 40% alcohol
- Clean glass bottle with a tight-fitting lid

Why You’ll Love This Homemade Vanilla Extract
✔️ Only 2 ingredients
You only need real vanilla beans and alcohol to make a beautiful homemade vanilla extract.
✔️ Less than 10 minutes hands-on work
The preparation is very quick. Split the beans, place them in the bottle, cover with alcohol, shake, and store.
✔️ Rich real vanilla flavour
Madagascar vanilla beans give the extract a warm, sweet, floral vanilla aroma that becomes deeper over time.
✔️ No hidden extras
Unlike many commercial options, this homemade vanilla extract contains no added sugar, artificial flavours, colourings, or unnecessary additives.
✔️ Better control over quality
You choose the vanilla beans, the alcohol, the bottle, and how long you want it to age.
✔️ Perfect for healthy baking
Use it in cakes, cookies, muffins, granola, pancakes, custards, chia puddings, smoothies, coffee, and homemade desserts.
✔️ Beautiful homemade gift
A bottle of homemade vanilla extract looks elegant and thoughtful, especially when made in a pretty glass bottle.
✔️ Easy to top up and reuse
As long as the vanilla beans stay covered, you can top up the bottle with more alcohol and continue using it.

How Long Does Homemade Vanilla Extract Take?
Homemade vanilla extract can be used after 4 months, especially if the vanilla beans are split open and you use a generous amount of beans. At this stage, the extract will have vanilla flavour, but it may still smell a little stronger in alcohol and taste younger.
For a smoother, richer homemade vanilla extract, 6 months is a better minimum. This gives the alcohol more time to pull out the vanilla oils, seeds, and flavour from the pods. For the deepest, roundest flavour, 12 months is even better. The longer it sits, the more beautiful, mellow, and full-bodied the vanilla becomes.

Best Vanilla Bean to Alcohol Ratio
For a strong homemade vanilla extract, use 5 to 6 whole Madagascar vanilla beans for every 1 cup, 250 ml, of alcohol.
For a 450 ml bottle, 12 Madagascar vanilla beans is a beautiful premium amount, especially once the beans are split open. Because the beans take up space inside the bottle, you may not need the full 450 ml of alcohol. Add enough alcohol to fill the bottle and fully cover every vanilla bean.
If your Madagascar vanilla beans are very small, thin, or dry, you can add a few extra beans for a stronger extract. If your beans are large, plump, oily, and fragrant, 12 beans in a 450 ml bottle will give you a rich homemade vanilla extract.
For a more professional measurement, many vanilla extract guides use weight because vanilla beans vary in size. A common single-fold style ratio is around 4 to 6 vanilla beans, or about 24 to 28 g vanilla beans, per 1 cup of alcohol. For home baking, the bean-count method is easier and works beautifully when the beans are good quality.

How to Make Homemade Vanilla Extract Step by Step
Step 1: Split and open the vanilla beans
Start by placing your Madagascar vanilla beans on a plate or cutting board. If your bottle is short, cut the beans in half crosswise first so they fit inside and stay fully submerged. Then use a sharp paring knife to carefully slice each piece open lengthwise down the centre. Flip the bean pieces over and make 5 to 6 small widthwise cuts on the other side, being careful not to cut all the way through. Gently pull the pods open to expose those tiny black seeds and rich vanilla oils inside.

Step 2: Add the vanilla beans to the bottle
Place the opened vanilla beans into your clean, completely dry glass bottle. Try to settle the pieces toward the bottom so they do not get stuck near the narrow neck. This helps the beans stay fully submerged once the alcohol is added, which is important for keeping your vanilla extract fresh and safe as it infuses.

Step 3: Pour, shake, and let it infuse
Pour the vodka or alcohol over the vanilla beans until they are completely covered. Seal the bottle tightly and give it a good shake to help release the vanilla seeds into the liquid. Then place the bottle in a cool, dark cupboard and let time do the rest. After 4 months, it can be used in baking, but for a smoother, richer vanilla extract, 6 to 12 months gives the most beautiful flavour.


Use homemade vanilla extract in baking recipes
- Florentine Cookie Pizza
- Gluten-Free Banana Bread Crumble Muffins
- Crunchy Black Tahini Granola Clusters
- Fig Almond Olive Oil Cake
- Almond Crisp Cookies
- Bakery-Style Pistachio Chocolate Chunk Cookies
- The Best Healthy Moist Matilda’s Cake.
Homemade Vanilla Extract | Easy 2-Ingredient Recipe
Ingredients
- 12 Madagascar vanilla beans Grade A or Grade B
- 450 ml vodka 35% to 40% alcohol
- 1 clean 450 ml glass bottle with a tight-fitting lid
Instructions
- Clean the bottleWash your glass bottle thoroughly with warm soapy water. Allow it to air dry completely before adding the vanilla beans and alcohol. The bottle should be fully dry before you pour anything inside.
- Size and cut the vanilla beans if neededLay the Madagascar vanilla beans flat on a cutting board or a plate and check their length against your bottle. If you are using a short bottle or pocket flask, cut the vanilla beans completely in half crosswise first so they can fit inside the bottle and stay fully submerged.
- Slice the vanilla beans openUse a sharp paring knife to slice each vanilla bean piece open lengthwise down the centre. Then flip the bean piece over and make 5 to 6 small width wise cuts on the other side, being careful not to cut all the way through. Gently pull the halves slightly open to expose the tiny black seeds and rich oils inside.
- Pack the beans into the bottleSlide the open, double-sliced vanilla beans into your clean bottle. Make sure all the pieces settle flat toward the bottom of the bottle so they do not get stuck near the narrow neck.
- Fill with alcoholPour the vodka or alcohol over the vanilla beans until the bottle is full and every bean is completely covered. The beans must stay fully submerged to prevent drying out or mould. If needed, use a clean utensil to push the pods firmly down to the bottom of the bottle.
- Shake and storeSeal the lid tightly and shake the bottle well for about 30 seconds to help disperse the loose vanilla seeds into the liquid. Store the bottle in a cool, dark cupboard or pantry away from sunlight.
- Infuse the vanillaShake the bottle once a week for the first month to help move the vanilla oils through the alcohol. Let the vanilla extract infuse for at least 4 months before using. For a smoother, richer flavour, allow it to mature for 6 months. For the deepest, roundest flavour, leave it for 12 months.
- Top up as neededAs you use your homemade vanilla extract, the liquid level will drop. Never let the vanilla beans sit exposed to the air because they can dry out or develop mould. Use a clean utensil to push the pods back down to the bottom of the bottle so they stay submerged. Whenever you use a few tablespoons, top the bottle back up with a fresh splash of vodka or alcohol, shake it gently, and return it to your pantry.
Notes
- Use 35% to 40% alcohol, or 70 to 80 proof, for homemade vanilla extract.
- Vodka gives the cleanest vanilla flavour because it is neutral and lets the Madagascar vanilla beans shine.
- Bourbon, rum, or brandy can also be used if you want a warmer, deeper flavour.
- Grade B vanilla beans are often preferred for extract because they are drier and concentrated, but Grade A beans also work beautifully.
- Always keep the vanilla beans fully covered with alcohol. Exposed beans can dry out or develop mould.
- If your beans are very small, thin, or dry, add a few extra beans for a stronger extract.
- When the extract is finished and the pods no longer have much flavour, you can dry the spent pods and place them in a jar of sugar to make homemade vanilla sugar.
Let’s Answer Your Vanilla Making Questions
What kind of vodka should I use?
You do not need expensive vodka to make homemade vanilla extract. A standard, mid-tier 80-proof vodka, which is 40% alcohol, works beautifully. Vodka has a neutral flavour, so it allows the warm, sweet Madagascar vanilla flavour to shine without adding a strong alcohol taste.
Can I use other types of alcohol instead?
Yes, you can use bourbon, rum, or brandy if you want a deeper, warmer, and more complex flavour in your baking. Vodka is the most popular choice because it gives a clean, classic vanilla extract, while bourbon, rum, and brandy create a richer flavour profile.
What is the difference between Grade A and Grade B vanilla beans?
Grade A vanilla beans are usually softer, plumper, and higher in moisture, which makes them lovely for scraping the seeds into frostings, custards, cakes, and desserts. Grade B vanilla beans are usually drier and more concentrated, which makes them a great choice for homemade vanilla extract because they infuse beautifully into alcohol.
What should I do if my vanilla beans float up?
If the vanilla beans float to the top, use a clean utensil to gently push them back down under the alcohol. The beans should always stay fully submerged because exposed vanilla pods can dry out or develop mould.
How do I handle short bottles or pocket flasks?
If you are using a short bottle or pocket flask, cut the vanilla beans in half crosswise before slicing them open. This helps the beans fit comfortably inside the bottle and keeps them fully covered by the alcohol while the extract matures.

